Document Templates
The Document Templates functionality is designed to help practices create, manage, and reuse standardised documents for patient and administrative communication. By using predefined and customisable templates with built-in merge fields, practices can automatically populate documents with patient and practice data, ensuring accuracy, consistency, and professional presentation while significantly reducing the time spent on repetitive document creation.
Location: Admin ->Documents, Forms and Templates
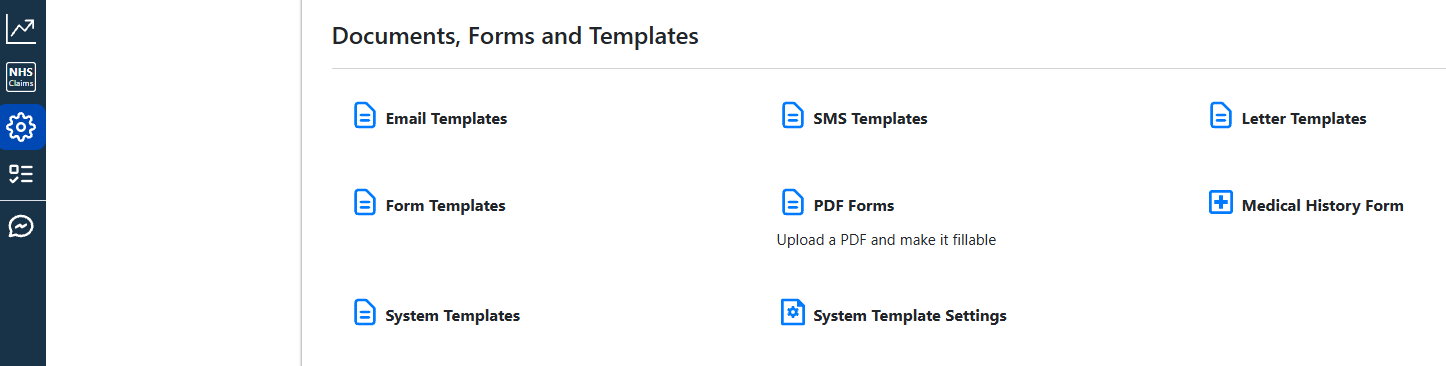
Email Templates
They are used to create standardised email messages for patient and practice communication, ensuring consistent wording and branding.
Emails have no character limits, allowing users to include more detailed information, images, and formatting as needed.
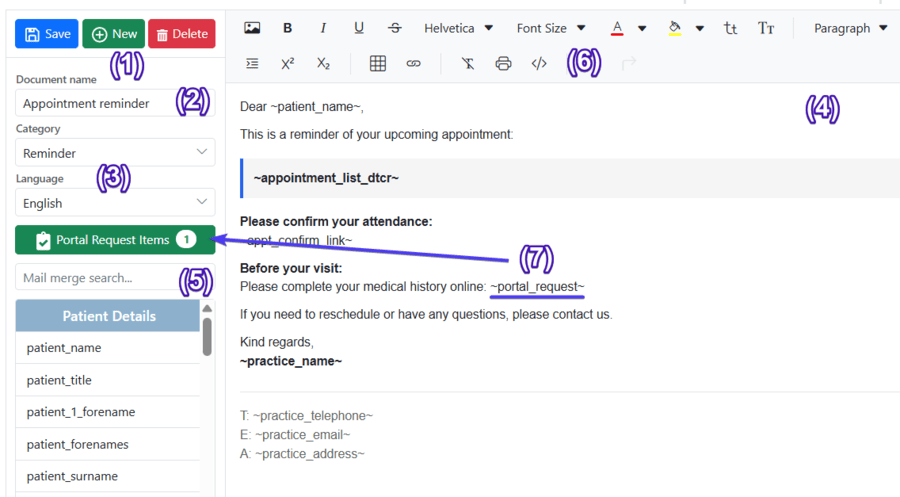
New Email template
- Click + New.
- Enter a document name.
- Choose a category and language.
- Enter the email text.
- You can add mail merge fields to automatically include patient-specific data.
- Format the content as needed by changing:
- font styles,
- structuring text with paragraphs,
- adding tables,
- lists,
- clickable links.
- Enable a portal request ~portal_request~ if required
- Click Save.
- The new email template will then appear in the list on the left-hand panel.
Adding a Link to a Medical Form
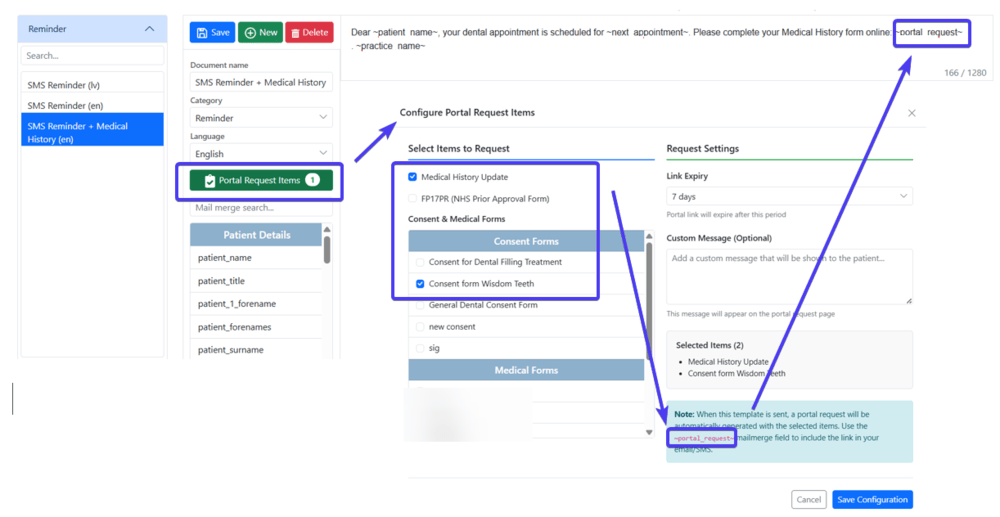
You can include a link to any medical form configured in the system within an Email template.
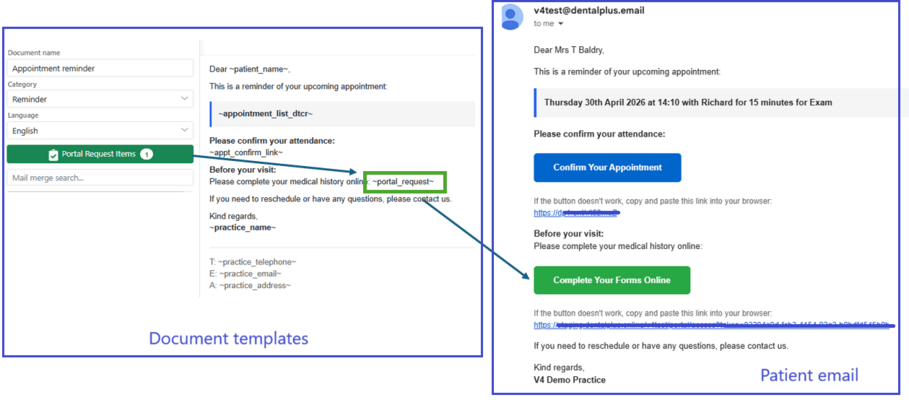
- Click the green Portal Request Items button.
- Select the required forms.
- Copy the ~portal_request~ mail merge field
- Save the configuration.
- Paste ~portal_request~ into the email template.
- Save the template changes.
Emails in the Patient Mailbox
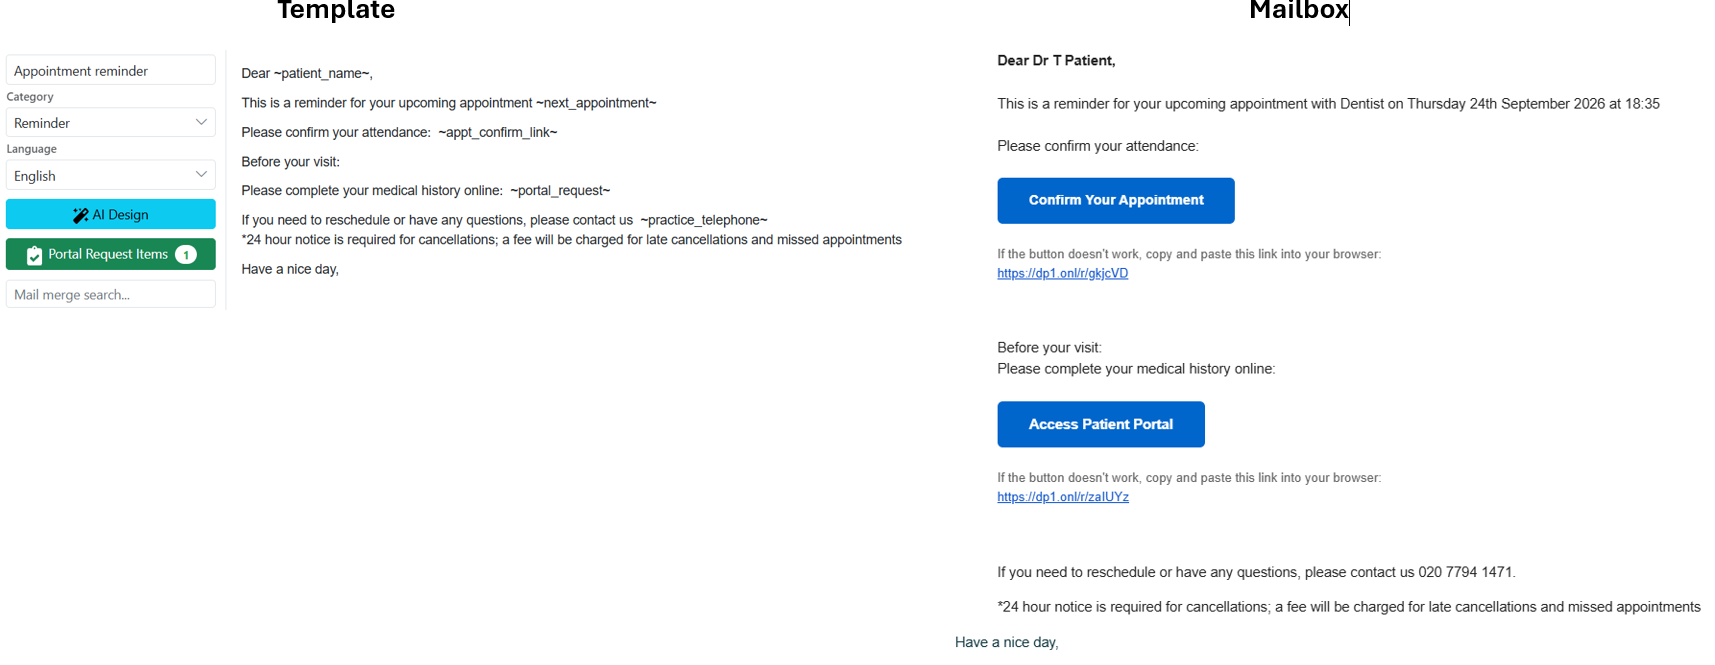
When the system sends an email reminder, it appears in the patient’s mailbox with clickable buttons and links. Patients can use these buttons to take the relevant action directly from the email.
Editing an email template
- Open the Admin section and go to Documents, Forms and Templates.
- Click Email templates.
- Expand the list and select a template you want to edit.
- Make the necessary changes.
- Click Save.
Deleting a template
- Open the Admin section and go to Documents, Forms and Templates.
- Click Email templates.
- Expand the list and select the form you want to delete.
- Click Delete.
SMS Templates
SMS templates are short, predefined text messages for reminders, notifications, and alerts sent to patients. They play a key role in reducing no-shows and keeping patients consistent with their oral care. These templates are easily customisable, allowing dental practices to send timely, professional reminders with minimal effort.
SMS template should be short. 160 symbols use 1 text credit.
- Open the Admin section and navigate to the Documents, Forms and Templates section.
- Click SMS templates.
For convenience, all templates are grouped into folders based on their intended use:
- Reminders
- Recalls
- Exited
- Marketing
- Other
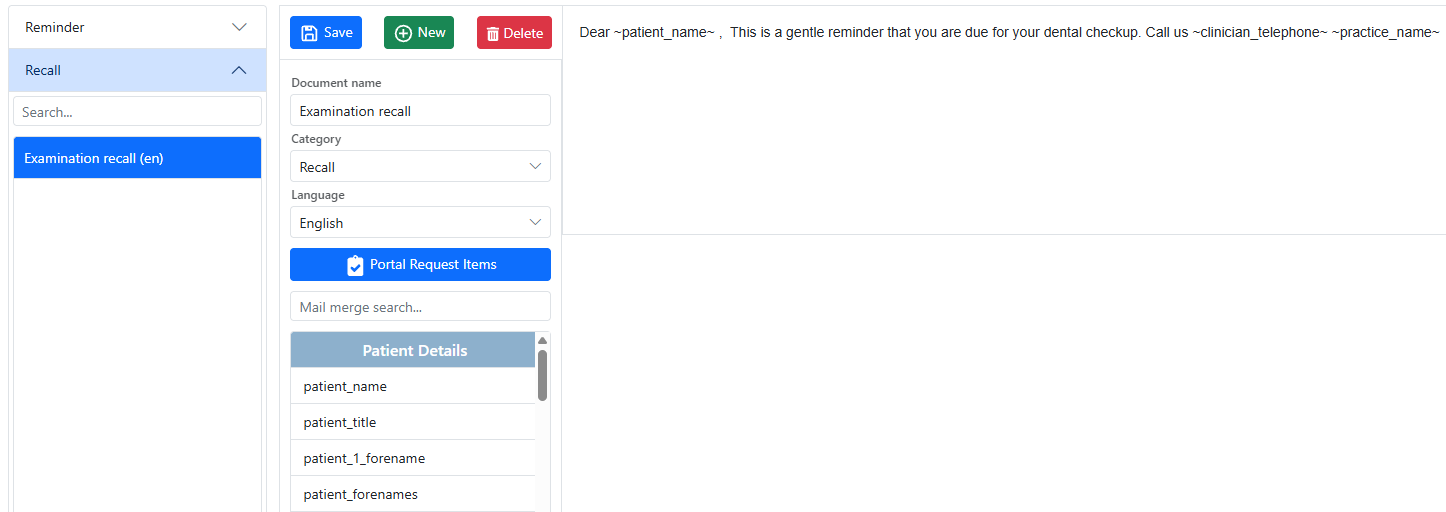
How to add a new SMS template
- Click + New.
- Enter a document name.
- Choose a category and language.
- Enter the message text. You can add mail merge fields to automatically include patient-specific data in the SMS.
- Click Save.
- The new sms template will then appear in the list on the left-hand panel.
Adding a Link to a Medical Form
You can include a link to any medical form configured in the system within an SMS template.
- Click the green Portal Request Items button.
- Select the required forms.
- Copy the ~portal_request~ mail merge field
- Save the configuration.
- Paste ~portal_request~ into the SMS template text.
- Save the template.
Editing an SMS template
- Open the Admin section and go to Documents, Forms and Templates.
- Click SMS templates.
- Expand the list and select a template you want to edit.
- Make the necessary changes.
- Click Save.
Deleting a template
- Open the Admin section and go to Documents, Forms and Templates.
- Click SMS templates.
- Expand the list and select the form you want to delete.
- Click Delete.
Effective SMS Templates
| 1. Simple Appointment Reminder Hi ~patient_name~, just a quick reminder of your upcoming dental appointment on ~next_appointment~. Please confirm your attendance: ~appt_confirm_link~. We look forward to seeing you soon! | 2. Reminder + Medical History + Attendance Confirmation Hello ~patient_name~, your dental appointment is scheduled for ~next_appointment~. Please complete your Medical History form online: ~portal_request~ . | 3. Rescheduling-Friendly Reminder Hi ~patient_name~, this is a friendly reminder about your upcoming appointment on ~next_appointment~ . Can’t make it? No worries—just let us know and we’ll find a better time. | 4. Promotional Reminder with Appointment Hey ~patient_name~, your appointment is set for ~next_appointment~. Ask us about our current teeth whitening promotion—a brighter smile might be closer than you think! |
| 5. 24-Hour Appointment Reminder Hello ~patient_name~, just a reminder that your appointment is tomorrow at ~next_appointment~. If you need anything beforehand, don’t hesitate to contact us at [Contact Info]. | 6. Missed Appointment Follow-Up Hi ~patient_name~, we missed you today! If you'd like to reschedule your appointment, just reply to this message or call us. We’d love to see you soon. | 7. Patient Feedback Request Thank you for visiting, ~patient_name~! We’d really appreciate your feedback. Please take a moment to share your thoughts here: [Feedback Form Link]. Your opinion helps us improve! | 8. Post-Surgery Follow-Up Reminder Hi ~patient_name~, this is a reminder for your post-surgery check-up on ~next_appointment~. We’ll review your healing and address any concerns. |
| 9. Follow-Up Appointment Request Hi ~patient_name~, we hope you're doing well! It’s time to schedule your next dental check-up. Book now using this link: [Online booking Link]. See you soon! | 10. New Patient Welcome + Reminder Welcome, ~patient_name~! We're excited to meet you at your first appointment on ~next_appointment~. Feel free to reach out if you have any questions beforehand. | 11. Follow-Up & Feedback Combo Hi ~patient_name~, thank you for your recent visit! Your next appointment is on ~next_appointment~. We’d also love to hear your feedback here: [Link]. | 12. Reminder + Directions Hi ~patient_name~], your appointment is set for ~next_appointment~. If you need help finding us, click here for directions: [Map Link]. |
Letter Templates
They provide reusable formats for printed or electronic letters, such as referrals, confirmations, and official correspondence.
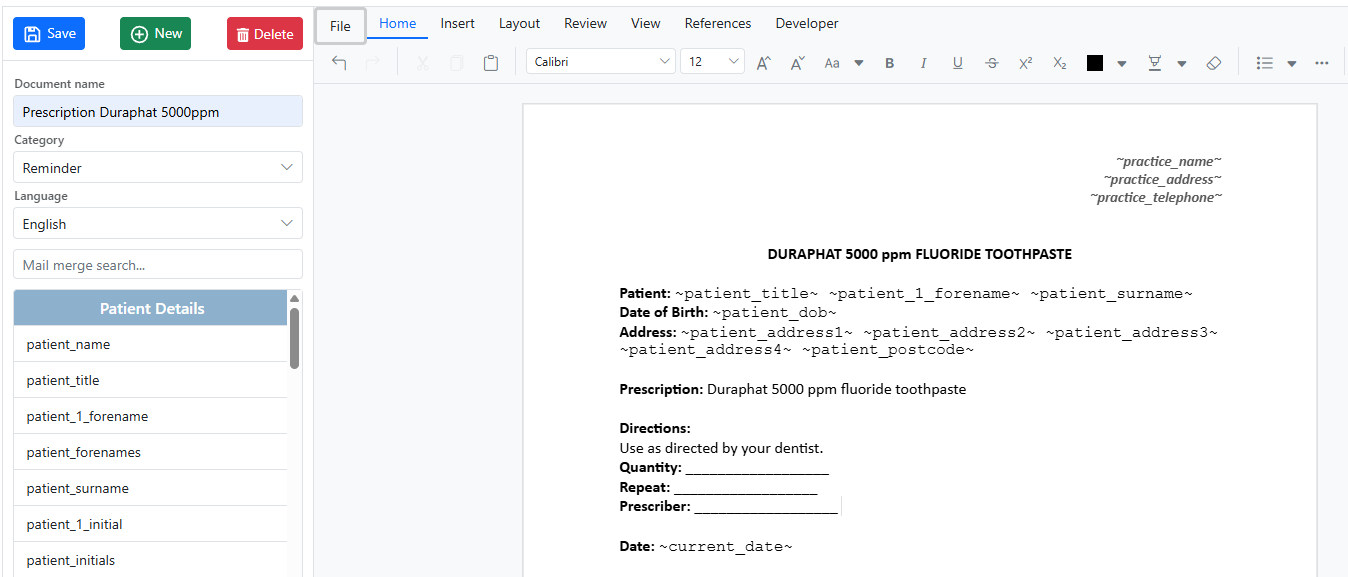
How to add a new Letter template
- Click + New.
- Enter a document name.
- Choose a category and language.
- Create a letter in the editor area.
- Use mail merge fields to insert patient-specific data automatically.
- Format the content as needed by changing:
- font styles,
- structuring text with paragraphs,
- adding tables,
- lists,
- images
- clickable links.
- Click Save.
- The new letter template will then appear in the list on the left-hand panel.
How to edit a letter template
- Open the Admin section and go to Documents, Forms and Templates.
- Click Letter templates.
- Expand the list and select a template you want to edit.
- Make the necessary changes.
- Click Save.
How to delete a template
- Open the Admin section and go to Documents, Forms and Templates.
- Click Letter templates.
- Expand the list and select the form you want to delete.
- Click Delete.
Form Templates
The Form Templates Editor is used to create digital forms for collecting patient consents and information. Once created, forms can be sent to patients, and completed forms are automatically saved in the patient record.
How to add a form template
- Open the Admin section and navigate to the Documents, Forms and Templates section. Click Form templates.
- Click + New.
- Enter a form name.
- Choose a Category and a Language.
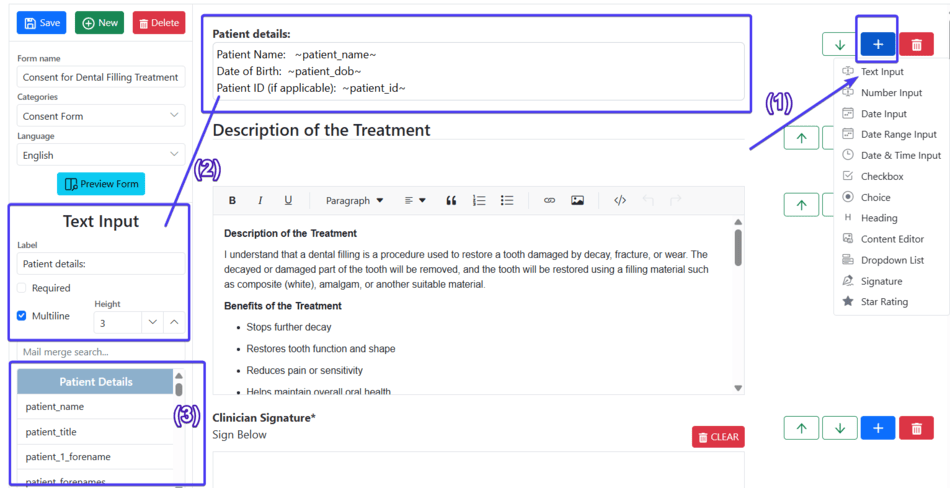
- Click the + button and select the widget you want to add. (1)
- Once the widget appears on the screen, click on it to adjust settings or add necessary text. (2)
- Add mail merge fields to display the actual patient data in the form. (3)
- Repeat steps 4–6 until the template is complete.
- Click Save.
- The new form template will then appear in the list on the left-hand panel.
How to edit a form template
- Open the Admin section and go to Documents, Forms and Templates.
- Click Form templates.
- Expand the list and select the form you want to edit.
- Make the necessary changes.
- Click Save.
How to delete a form template
- Open the Admin section and go to Documents, Forms and Templates.
- Click Form templates.
- Expand the list and select the form you want to edit.
- Click Delete.
Example of a simple consent form
- Go to
Admin->Documents, Forms and Templates -> Form Templates - Click + New , enter a name and choose a category.
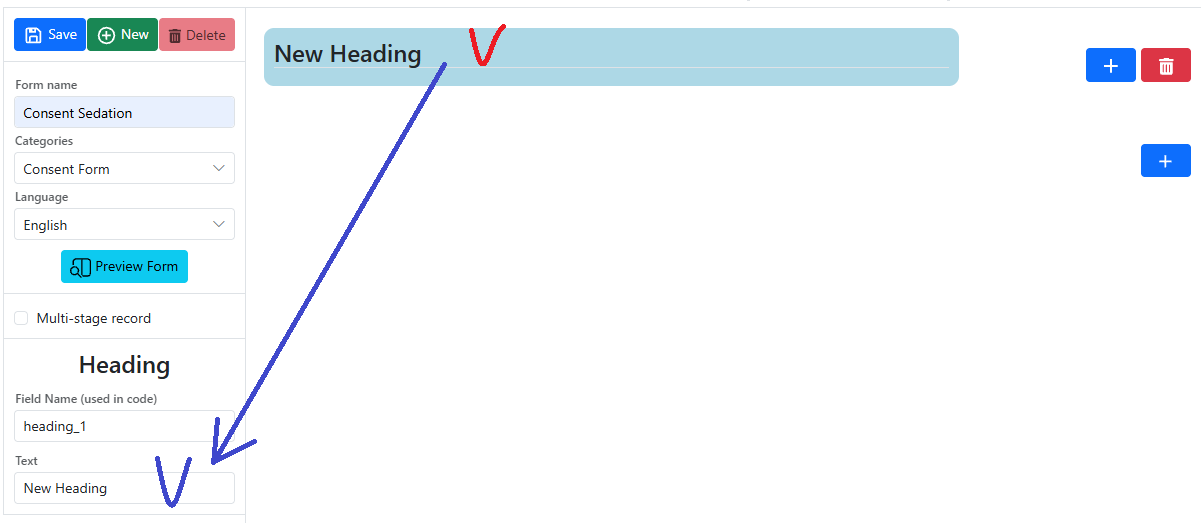
- Click the + button and select the Heading widget . This widget allows the form name to be displayed.
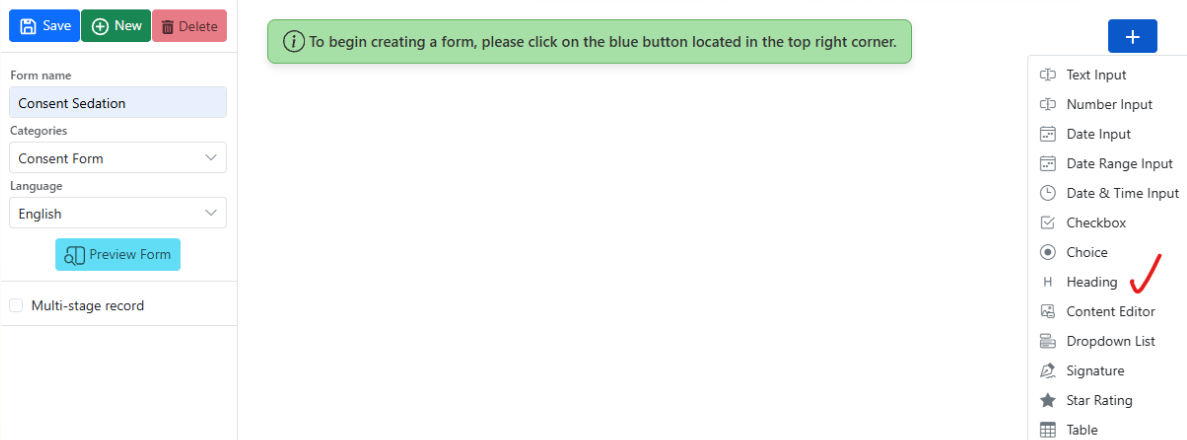
- Once the widget appears on the screen, click on it to adjust settings.
- Edit the text to “Consent Form for Sedation Treatment”.
- Click anywhere outside the text box to apply the changes.
- Click the + button and select the Content editor widget.

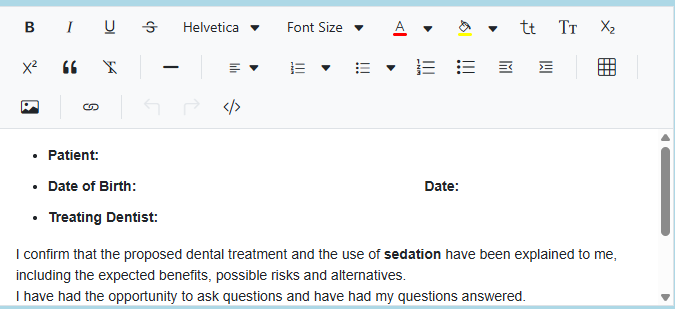
A simple text editor will appear, allowing users to type or paste text, format content, and add tables, links and images using the toolbar. The toolbar works in a similar way to familiar programs such as Microsoft Word. Users can add and update content directly in the editor.
- Click it to enter or insert the consent form text.
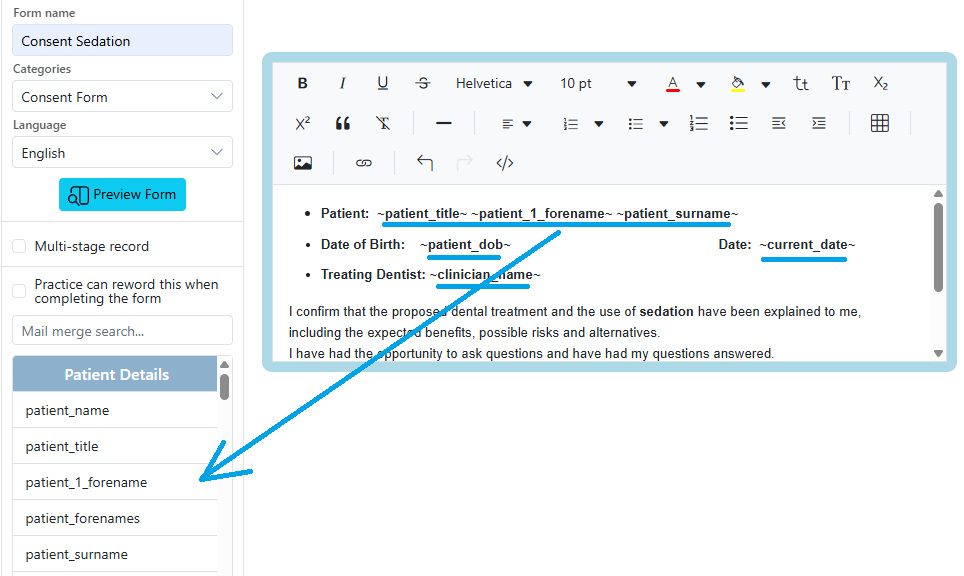
- Use mail-merge fields to automatically insert information from the patient’s record into the document.
- Go through the list or search for a field by name.
- Click the required field to add it to the template.
- If you would like to edit the text before sending it to the patient, for example, to add a tooth number or medication, tick the box .

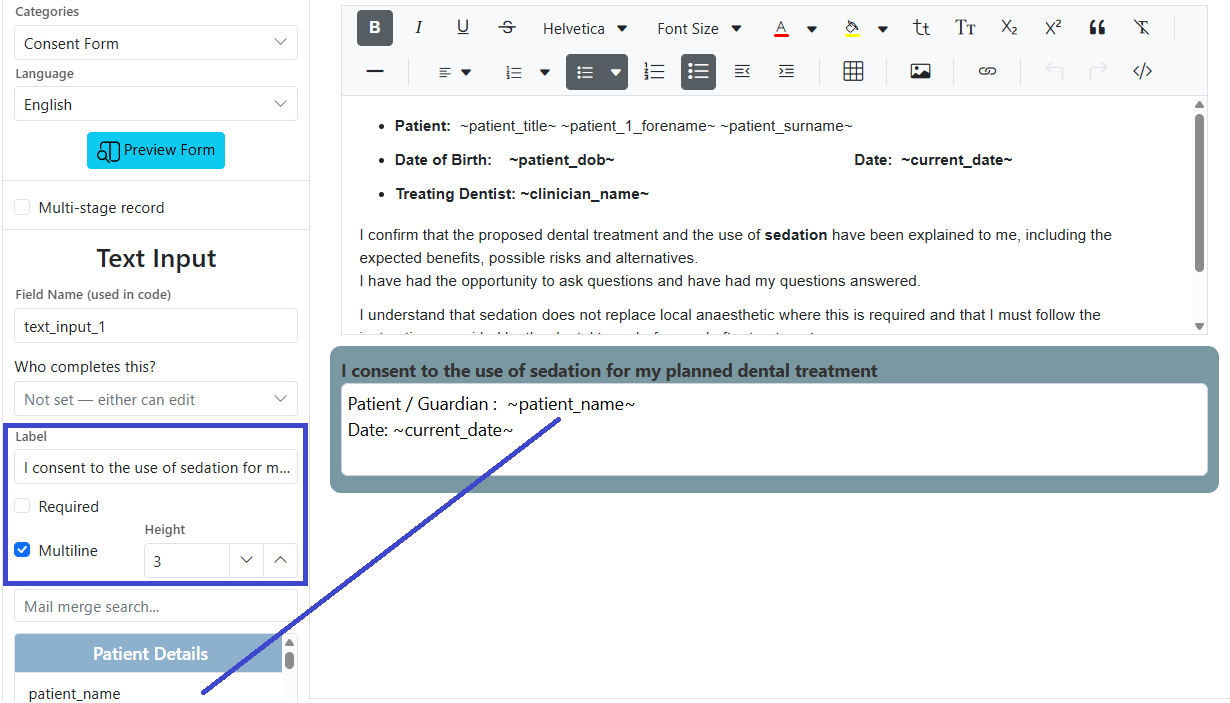
- Another useful widget is the Text Input . It appears as a ready-to-complete field with pre-filled patient information, which the patient can confirm or edit before completing the form.
- Click the + button to add it
- Click the widget to start editing it.

- Adjust the settings for this field:
- Add a Label, for example, Patient Consent.
- Choose whether the field is Required.
- Enable the Multiline option if needed.
- Enter the required text related to the patient’s details using mail-merge fields.
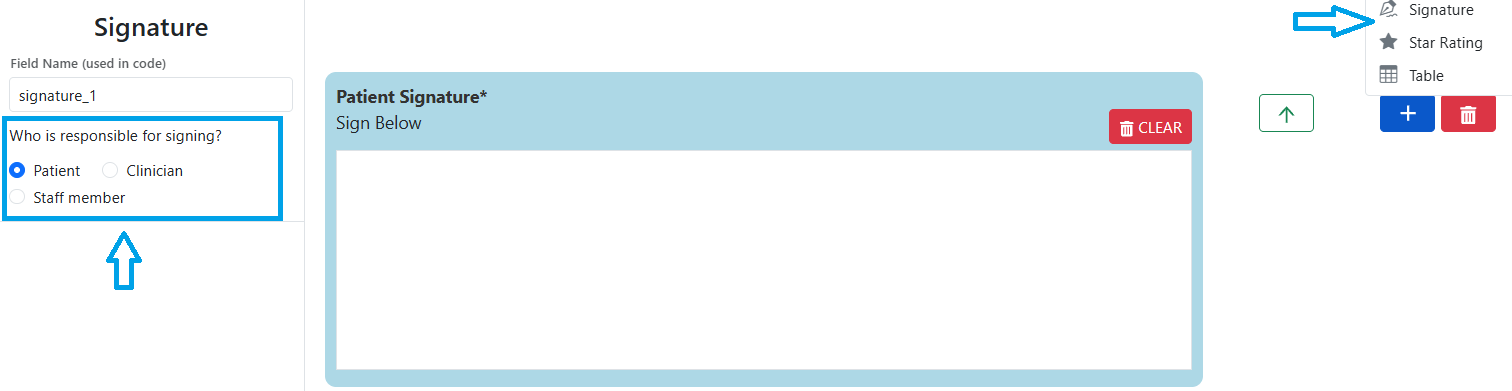
- The final step when creating a consent form is to add a field for the patient’s signature.
When completing the form, the patient can draw their signature using their finger, mouse or stylus. The signature is then saved with the completed document. In the widget settings, you can choose who is responsible for signing the form. For this simple consent form, we only need to collect the patient’s signature.
- Click Save
- The form will appear in the list under Consent Forms folder
- The form is now ready to be used. Open the Patient Record to use the form:
- Go to
Patient Record -> Formsif the form needs to be edited before sending. - Go to
Patient Record -> Form Requeststo send the form with the text saved in the template.
System Templates
This section contains templates used by DentalPlus for internal processes and tasks, such as receipts, medical history forms, invoices, treatment plans and statements.
How to add a system template
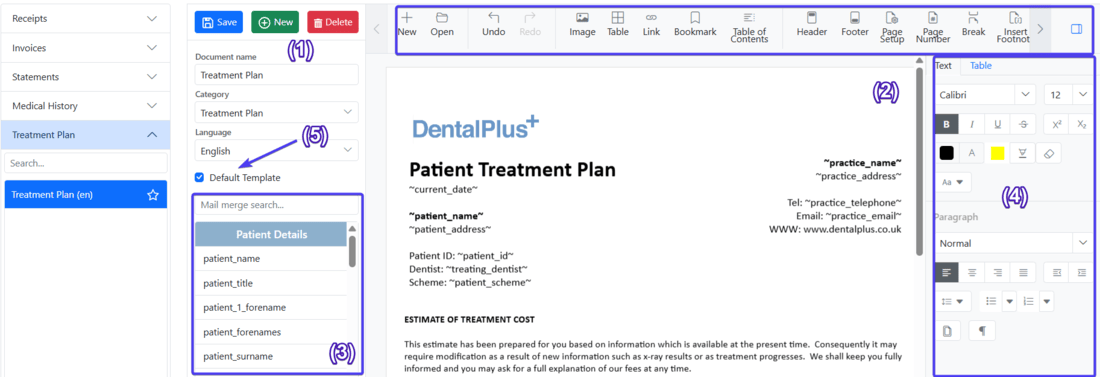
- Open the Admin section and navigate to the Documents, Forms and Templates section. Click System templates.
- Click + New. (1)
- Enter a document name.
- Choose a Category and a Language.
- Create a template in the editor area. (2)
- Use mail merge fields to insert patient-specific data automatically. (3)
- Format the content as needed by changing font styles, structuring text with paragraphs, and adding tables, lists, images or clickable links. (4)
- Set it as the default if required (5)
- Click Save.
- The new system template will then appear in the list on the left-hand panel.
How to edit a system template
- Open the Admin section and go to Documents, Forms and Templates.
- Click System templates.
- Expand the list and select a template you want to edit.
- Make the necessary changes.
- Click Save.
How to delete a system template
- Open the Admin section and go to Documents, Forms and Templates.
- Click System templates.
- Expand the list and select a template you want to edit. If the selected template is set as the default, the system will display a warning to let you know before you make any changes.
- Click Delete.
Medical History Form
This section allows you to manage the Medical History Questionnaire layout by adding sections and questions, rewording existing questions, and deleting information that is no longer required.
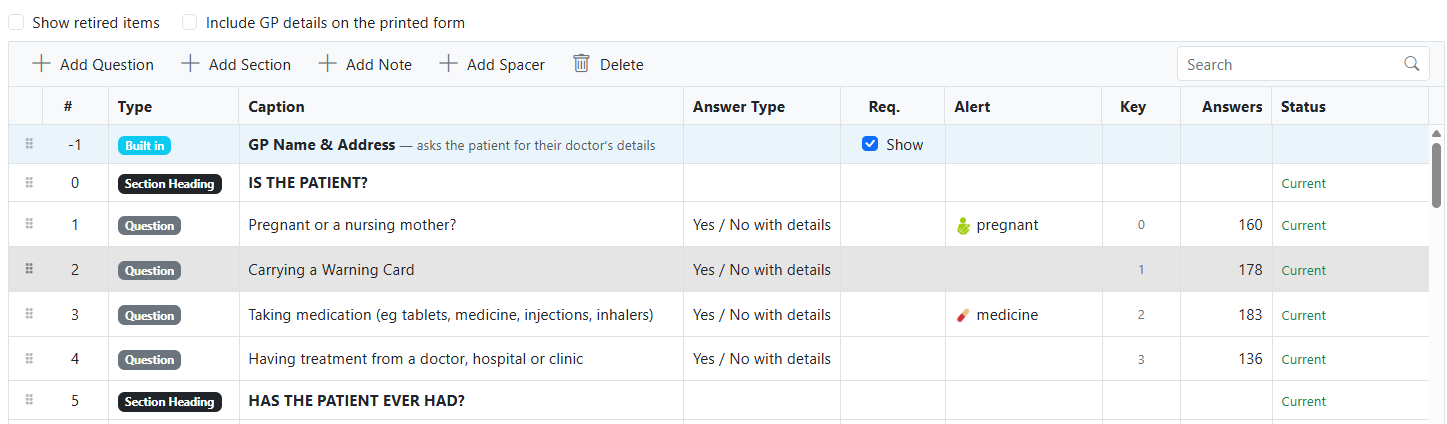
- Use the toolbar to add a Question, Section, Note or Spacer.
- Enter the required description.
- Configure the available settings.
- Click Save to save your changes.
- Double-click any row to edit an existing entry.
- Click an entry to select it, then click Delete to remove it from the Medical History form layout.
Auto-communications
DentalPlus is designed to automatically send different types of communications. They can include
- appointment reminders,
- follow-ups after treatment,
- recall messages encouraging patients to book their next visit.
Each message can be customised with a portal request link, allowing patients to complete forms or book appointments online. Once set up, the system will automatically send these messages either on a scheduled basis or triggered by specific events within the system.
This ensures consistent communication, saves staff time, and improves patient engagement through a fully automated digital workflow.
Mail merge fields
In DentalPlus, mail-merge fields are placeholders that automatically insert information from the patient’s record into a document or message.
For example, instead of entering the patient’s name manually, the template can use: ~patient_1_forename~ ~patient_surname~
When a letter or prescription is created for a specific patient, DentalPlus automatically replaces the mail-merge fields with the relevant information from the patient’s record.
| Description | Mail merge field |
| Patient's name e.g. Mr Smith | ~patient_name~ |
| Patient's title e.g. Mr | ~patient_title~ |
| Patient's 1st forename e.g. John | ~patient_1_forename~ |
| All patient's forenames e.g. John Al | ~patient_forenames~ |
| Patient's surname e.g. Smith | ~patient_surname~ |
| Patient's 1st initial e.g. J | ~patient_1_initial~ |
| All Patient's initials e.g. J.A. | ~patient_initials~ |
| A list of all upcoming appointments | ~appointment_list~ |
| A list of selected appointments | ~appointments_select~ |
| Patients next appointment | ~next_appointment~ |
| Patients previous appointment | ~previous_appointment~ |
| Practice Name | ~practice_name~ |
| Practice Address | ~practice_address~ |
| Practice Phone | ~practice_telephone~ |
| Practice Email | ~practice_email~ |
| Name of the patient's default denti | ~clinician_name~ |
| Today's date | ~current_date~ |
| Patient Address | ~patient_address~ |
| Appointment Reason | ~appointment_reason~ |
| Appointment Duration | ~appointment_duration~ |
| Appointment Notes | ~appointment_notes~ |
| Appointment Clinician | ~appointment_clinician~ |
| Patient DOB | ~patient_dob~ |
| List of appointments with date and | ~appointment_list_dt~ |
| Patient record number | ~patient_id~ |
| e.g. Dentist/Hygienist | ~appointment_clinician_type~ |
| Date appointment needs confirmin | ~confirm_date~ |
| 1st Line of address | ~patient_address1~ |
| 2nd Line of address | ~patient_address2~ |
| 3rd Line of address | ~patient_address3~ |
| 4th Line of address | ~patient_address4~ |
| 5th Line of address | ~patient_address5~ |
| Postcode | ~patient_postcode~ |
| Home phone number | ~patient_homephone~ |
| Mobile phone number | ~patient_mobilephone~ |
| Work phone number | ~patient_workphone~ |
| Home email address | ~patient_homeemail~ |
| Alternative email address | ~patient_altemail~ |
| Always shows the postcode | ~patient_postcode2~ |
| Financial balance for patient | ~patient_balance~ |
| Last appointment failure | ~last_fta~ |
| Last cancelled appointment | ~last_cancelled~ |
| The clinician the report is for | ~report_clinician~ |
| Balance without minus sign - used | ~debt_balance~ |
| Patients age in years | ~patient_age~ |
| Patients previous appointment dat | ~previous_appt_date~ |
| The type of clinician the report is fo | ~report_clinician_type~ |
| Referring Dentist Name | ~referring_dentist_name~ |
| Referring Dentist Address | ~referring_dentist_address~ |
| Referring Dentist Phone | ~referring_dentist_phone~ |
| Referring Dentist Mobile | ~referring_dentist_mobile~ |
| Referring Dentist Email | ~referring_dentist_email~ |
| Referring Dentist Address1 | ~referring_dentist_address1~ |
| Referring Dentist Address2 | ~referring_dentist_address2~ |
| Referring Dentist Address3 | ~referring_dentist_address3~ |
| Referring Dentist Address4 | ~referring_dentist_address4~ |
| Referring Dentist Address5 | ~referring_dentist_address5~ |
| Referring Dentist Postcode | ~referring_dentist_postcode~ |
| List of appointments with date tim | ~appointment_list_dtc~ |
| List of appointments with date, tim | ~appointment_list_dtcr~ |
| Duration of the next appointment o | ~next_appointment_duration~ |
| Date of last examination | ~last_exam_date~ |
| Current treatment dentist | ~treating_dentist~ |
| Patients gender | ~patient_gender~ |
| When an appointment is rearrange | ~rearranged_appointment~ |
| Remote deposit request (where N is the amount e.g. ~deposit_50~) | ~deposit_Nt~ |