Reception Dashboard
Get quickly access the information and tasks that need attention. Watch DentalPlus Video

Appointment Confirmation
Appointment confirmations make it easier for the reception team to identify which patients have confirmed their appointments and which appointments still need attention.
Instead of calling every patient, DentalPlus can automatically request and track confirmations for you.
Once appointment confirmation is enabled in Admin Section, all new appointments are created with a Provisional status. This means the appointment must be confirmed either by the patient or by the practice.
How to Enable Appointment Confirmation
- Go to
Admin → Practice Setup → Appointment Book. - Enable
Require confirmation for new appointment. - Click Save. From this point onwards, all new appointments will be recorded as Provisional and will remain in this status until they are confirmed.
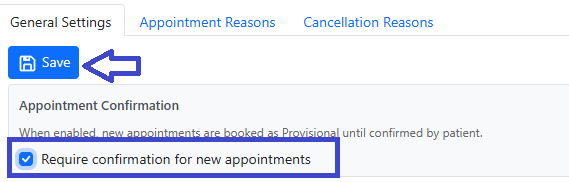
- Create an appointment reminder template (email or sms) containing the special appointment confirmation mailmerge field.
- Go to
Admin → Documents, Forms and Templates → Email Templates or SMS Templates. - Create a new template or open an existing appointment reminder template.
- Add the following text to the template:
Please confirm attendance: ~appt_confirm_link~ - Save changes
- Finally, check that this template is selected as the default appointment reminder under
Admin → Practice Setup → Communication Settings.
The system will send automatic appointment reminders with a personal confirmation link for each patient’s appointment and will wait for confirmation.
This feature highlights appointments that require more attention, helping users follow up on unconfirmed appointments and reduce FTAs .
How Appointment Confirmation Works
- Every day the system sends automatic appointment reminders
- The reminder includes a link that allows the patient to confirm their attendance.
- When the patient receives the email, they only need to click Confirm.
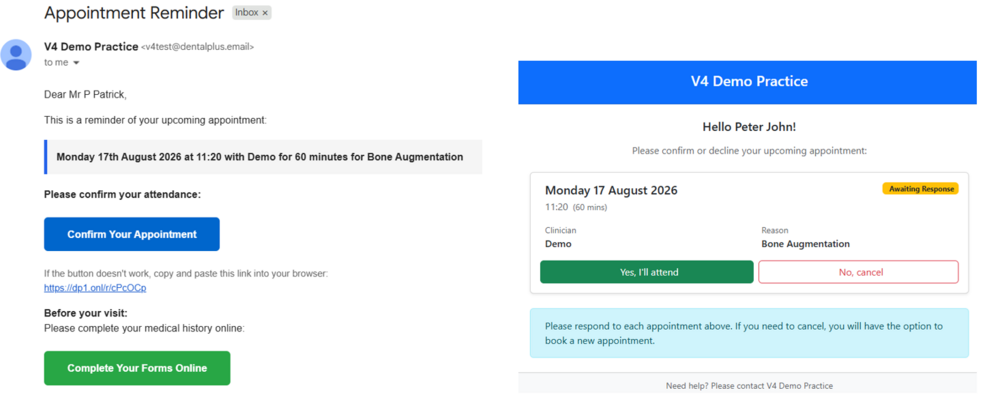
- The appointment status will then automatically change from Provisional to Booked.
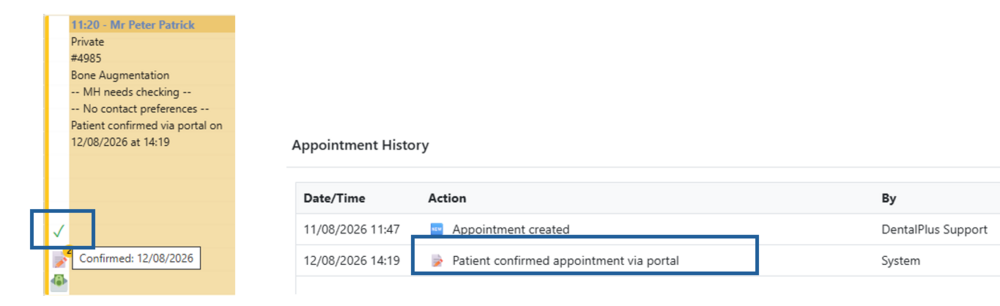
- The system will display confirmed icon in the appointment details and record this action in the Appointment history.
What Happens If the Patient Doesn't Confirm?
- The appointment remains Provisional.
- These appointments are highlighted on the Reception Dashboard under the Unconfirmed Appointments tab.
- The team can then contact the patient directly and confirm the appointment manually by clicking the confirmation button.
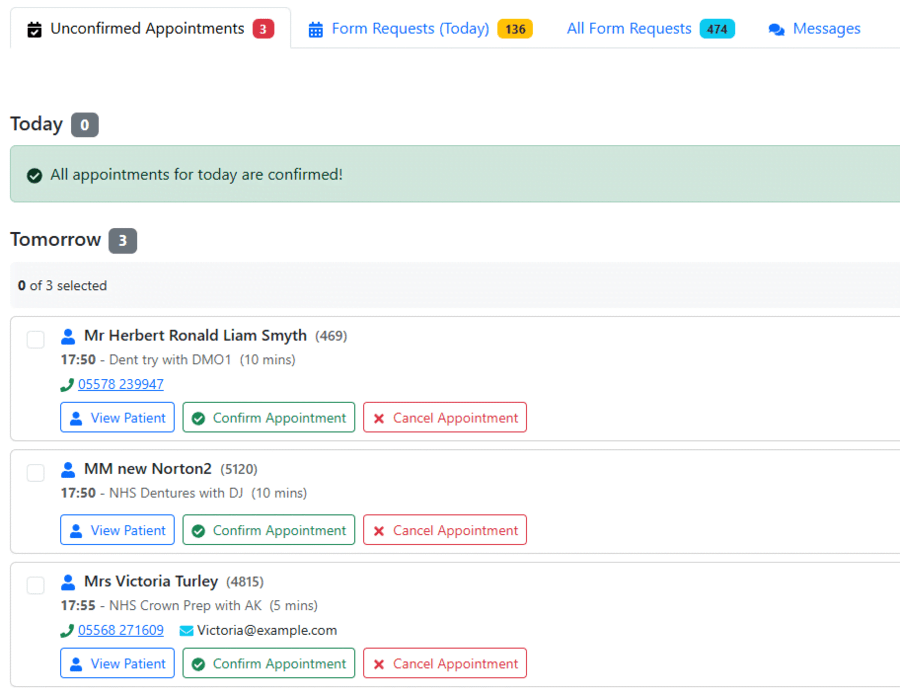
Users can also find all provisional appointments waiting for confirmation using the Appointment at Status report.
- Go to 'Reports' and select the Appointment at Status Report
- Select the required date range.
- Filter the results by Status: Provisional.
- View the results.
The appointment confirmation workflow gives your team a clear view of which appointments are confirmed and which ones may need follow-up, reduces FTAs and makes daily reception tasks easier to manage.
Form Requests Today
The Form Requests Today tab displays all form requests sent to patients today that are still pending.
From this tab, the reception team can resend a form without opening the patient's record, helping to save time and keep outstanding form requests up to date.
All Form Requests
The All Form Requests tab displays all outstanding form requests that have been sent to patients and are still pending.
This provides a quick overview of forms that require attention and allows the reception team to resend a form directly from the dashboard without opening the patient's record.