Financials
The Financial section provides a clear, chronological overview of all financial activity, including: Invoices, Payments, Deposits, Amendments . All financial records are colour-coded for quick identification and ease of use. Watch DentalPlus Video

Patients can pay their balance directly through the portal, or the practice can request payment from patients with outstanding balances and include payment links within reminder or other templates. All online payments are processed via Stripe
DentalPlus also supports payment integrations including Dojo, SumUp and Worldpay. Once an integration has been configured with DentalPlus and the payment provider, transactions can be automatically recorded and linked to the correct patient record. Payment integrations can be configured in the Admin section.
Invoicing
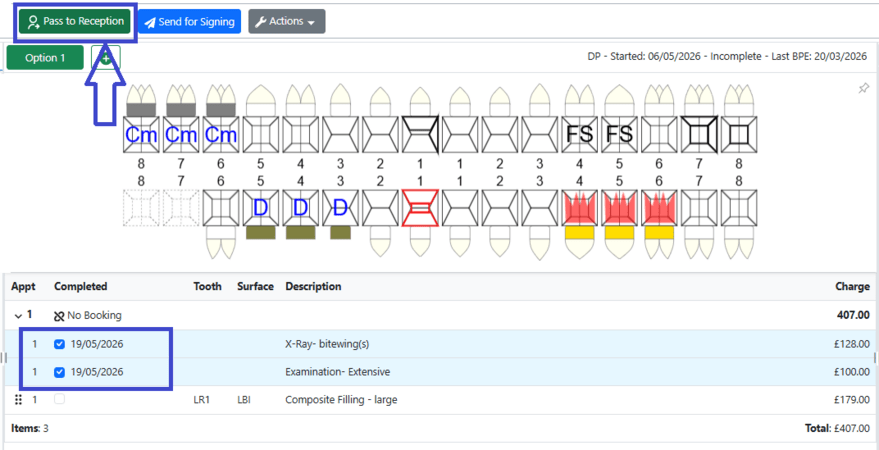
- Open the Patient Record and go to the Treatment section.
- Tick the “Completed” checkbox next to each treatment in the treatment plan.
- Click “Pass to Reception” on the top toolbar
- Check details: date, staff member and payment terms.
- Save invoice
- The invoice will appear in the Patient Financials.
How to take a payment…
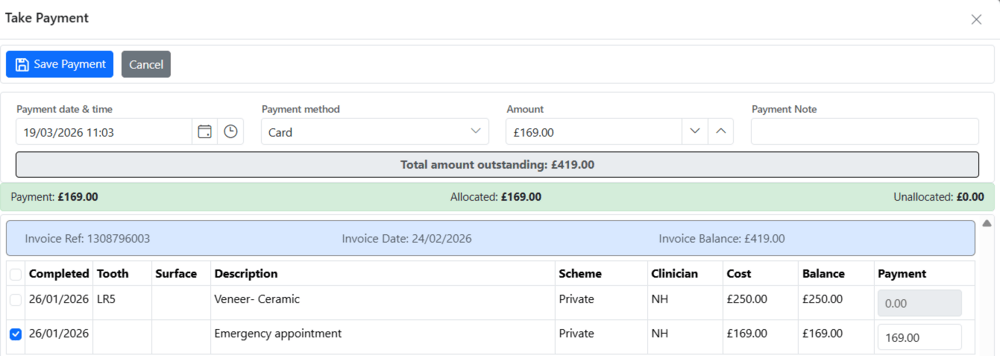
All payments need to be allocated to the corresponding invoices.

- Open the Patient Record and go to the Financials section.
- Click ‘Take Payment’
- Check that the correct invoice/treatment(s) is selected.
If the invoice contains several treatments but the patient is paying for only some of them, untick the treatments that should not be paid at this time.
- Enter the payment amount.
- Select the payment method.
- Select the staff member and date.
- Click Save.
The payment will appear in the patient's financial list and will be allocated to the selected treatments.
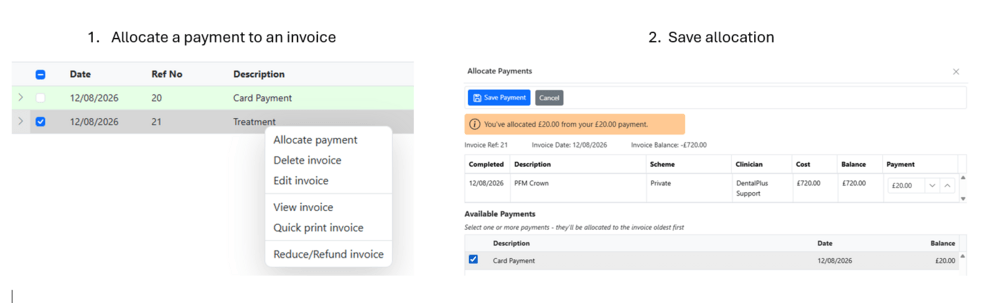
Allocating a Previous Payment
Sometimes a payment has already been received before an invoice is created, for example, when a patient makes a pre-payment.
In this situation:
- Create the invoice first.
- Right-click the required invoice.
- Select Allocate Payment.
- Check the invoice number, date and outstanding balance shown at the top.
- Select the available payment from the list.
- Click Save Payment. The payment will be allocated to the invoice.
The system allocates payments to specific treatments and clinicians, making it easy to track the income generated by each clinician.
How to take a deposit …
A Deposit is not linked to an invoice when it is taken. It remains available until it is allocated.
- Open the Patient Record and go to the Financials section.
- Click ‘Take Deposit ’
- Select the date and payment method.
- Enter the amount to be credited
- Choose who the deposit is credited to.
- Click ‘Save deposit’
- The deposit appears in yellow in the financial list.
When the deposit needs to be used, allocate it to the relevant invoice.
How to allocate a deposit…
- Open the Patient Record and go to the Financials section.
- Right-click the required invoice and select ‘Allocate Payment’.
- Choose an available pre-payment from the list, then click ‘Save Payment’.
To allocate multiple prepayments to one invoice, select all the required prepayments and click Save Allocation.
Expand the payment details to see which treatment it is allocated to, how much has been used, and the remaining balance.

Managing Financial Records
Right-click a financial record to access available actions, such as:
- Edit or Delete a payment
- View or Print an invoice
- View or Print a receipt
If an invoice contains an error, delete the invoice, make the necessary changes in the Treatment section, and create the invoice again.
When correcting older financial records, always check the date before saving.
How to edit payment details…
- Open the Patient Record and go to the Financials section.
- Right-click on the payment and select “Edit Payment”
- The following details can be edited:
- Staff – this will automatically be the default clinician of that patient
- Payment method – how the payment was made
How to delete payment…
- Open the Patient Record and go to the Financials section.
- Right-click on the required payment and select Delete Payment
- A pop-up will appear — enter the reason for deletion and click “Delete.”
- The payment will be marked as deleted.
Deleted payments remain visible in Financials. They appear in grey and can be viewed by using Filter → Show Deleted Items.
View or Print a Document
- Open the Patient Record and go to the Financials section.
- Invoice – Right-click the invoice and select “View Invoice” to print or email it.
- Receipt – Right-click the payment and select “View Receipt” to print or email it.
- Statement – Click “Print Statement” on the toolbar. The statement will open as a PDF, which can be printed, emailed, or saved.
Email Financial Documents
- Select the required document by ticking the box in the left column in Financials.
- Click the ‘Email’ icon on the toolbar.
- Choose a template, select a signature.
- The system will attach the relevant PDF invoices and receipts to the email and send them
Payment Requests and Online Payments
The Financials toolbar also allows you to send a Request Payment to a patient.
- Click Request Payment.
- Enter or select the required amount.
- Choose an appropriate email or SMS template.
- Select the payment method.
- Click Send.
The selected template includes a special field that generates a secure payment link for the patient.
Online payments can be processed through Stripe. Completed transactions are automatically recorded in the patient's Financials.
Financial amendments…
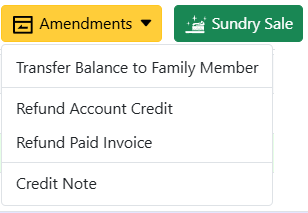
Transfer Balance to a Family Member
A patient’s positive balance can be transferred to a linked family member.
- Open the Patient Record → Financials section and click ‘Amendments’.
- Click ‘Transfer Balance to Family Member’
- Select a family member.
- Choose an available payment or payments.
- Enter an amount
- Click ‘Transfer Balance’.
A corresponding record will show in both patient records.
Issue a Credit Note:
A credit note can be issued to reverse all or part of an invoice, generating a corresponding credit on the patient’s account. It might be used for future treatments or issued immediately.
- Open the Patient Record → Financials section and click ‘Amendments’.
- Click ‘Credit note’
- Select a reason and date, and enter the amount.
- Decide whether to issue an immediate refund to the patient or create a credit note for future use.
- Click ‘Save Credit Note’.
- Records marked in red will appear in the list and can be used for future invoices.
If the refund is issued immediately, the amount is returned to the patient and does not increase their account balance.
If the refund is not issued immediately, a credit note is created and added to the patient's account for future use.
Refund Account Credit:
If a patient has a positive balance, the refund can be processed directly from the available account credit.
- Open the Patient Record → Financials section and click ‘Amendments’.
- Click ‘Refund Account Credit’
- Select a reason and date, enter the amount, and choose the refund method.
- Select a payment to be refunded
- Click ‘Save Refund’.
The record, coloured in purple, will then show on the list.
Reduce/Refund a paid invoice:
A paid invoice can be refunded by applying a discount that reduces the original charge and updates the patient’s account accordingly.
- Open the Patient Record → Financials section and click ‘Amendments’.
- Then click ‘Refund Paid Invoice’
- Select a reason and date.
- Choose the invoice to be adjusted
- Decide whether to issue an immediate refund to the patient or create a credit note for future use.
- Enter the amount
- Click ‘Apply Credit Note’.
- The record, marked in red, will then appear in the list and will be ready for future use.
Processing a sundry sale…
- Open the Patient Record and go to the Financials section.
- Click ‘Sundry Sale’
- Select an item from the menu
- Change the price if necessary
- Choose quantity
- Assign the sale to a specific clinician or practice
- Click ‘+Add’
- Repeat these steps if needed
- Click ‘Save’ to submit the invoice