Treatments and Charting
The Treatment section is one of the core components of the practice management software. It has been carefully designed to support both clinical decision-making and financial accuracy.

The toolbar at the top of the screen provides quick access to common actions. From here you can:
- create a new treatment plan
- load previous plans
- print the current plan
- pass completed treatments to Reception for invoicing
- send a treatment plan to the patient for electronic signature
- change the tooth chart view
- apply a discount to the entire treatment plan
- mark the treatment plan as completed
If the treatment plan has already been signed by the patient, the signature together with the signing date is displayed.
The toolbar also indicates whether any patient forms require clinician review. Select Forms to Review to open and complete these forms from the clinician's perspective.
Starting a New Treatment Plan
- Open
Patient Record > Treatment - Click New Plan in the top left toolbar.
- A new treatment plan will be created and ready to use.
The system allows to start a blank treatment plan or move incomplete treatments from the current treatment plan.
Loading a Previous Treatment Plan
- Open
Patient Record > Treatment - Click the Load button in the toolbar.
- A pop-up window will display all past treatment plans.
- Click the plan to open it.
Recording observations in the Base chart
The purpose is to establish a comprehensive record of a patient's oral health at the start of care.
-
Open
Patient Record > Treatment -
Navigate to the Observations tab in the top left area.
-
To configure the teeth view, follow
Actions**→ Tooth Viewand select Permanent, Deciduous or All. -
To add an observation item, select the item from the list:
- For a surface item, the selected surfaces will be highlighted in green.
- For a tooth item, the entire tooth will be highlighted.
- Multiple-tooth treatments will remain on hold until all relevant teeth have been selected.
Alternatively, you can hover the mouse pointer over the teeth in the chart, left-click the relevant surfaces or teeth, and right-click to select the required base item.
-
Click ‘Save’ to chart the item and record it in the ‘Base’ tab
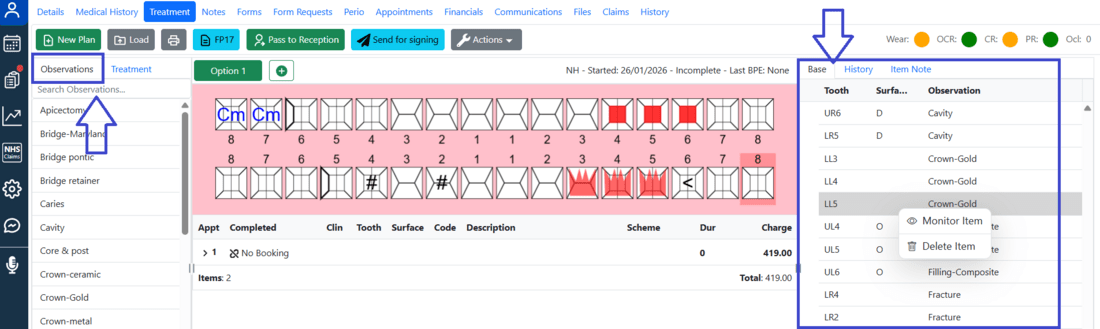
Base chart
The Base tab shows a list of all base items.
To monitor a base item and add a note:
- In the “Base” tab, right-click on the required observation.
- Click “Monitor item”
- An arrow will appear next to the item, and an ‘eye’-icon next to the tooth number on the chart
- Expand it and double-click to edit a note
- Enter a note and click ‘Save’
To remove the base item
- In the “Base” tab, right-click on the required observation.
- Select the Delete option.
Treatment plan
- Open
Patient Record > Treatment - Click New Plan or Load the existing one in the toolbar.
- Select the Treatments tab in the top left area.
- Add treatment items via the list of treatments or using the chart.
Adding items to a treatment plan from the list of treatments:
- For a surface item, the selected surfaces will be highlighted in green.
- For a tooth item, the entire tooth will be highlighted.
- Multiple-tooth treatments will remain on hold until all relevant teeth have been selected.
Adding items to a treatment plan from the chart:
- Hover the mouse pointer over the teeth on the chart,
- click the relevant surfaces or teeth,
- right-click to select the required base item.
- Click Save, and the items will be recorded in the chart and in the treatment plan
Each treatment plan opens separately, and completed treatments can be found in the History tab→Treatment
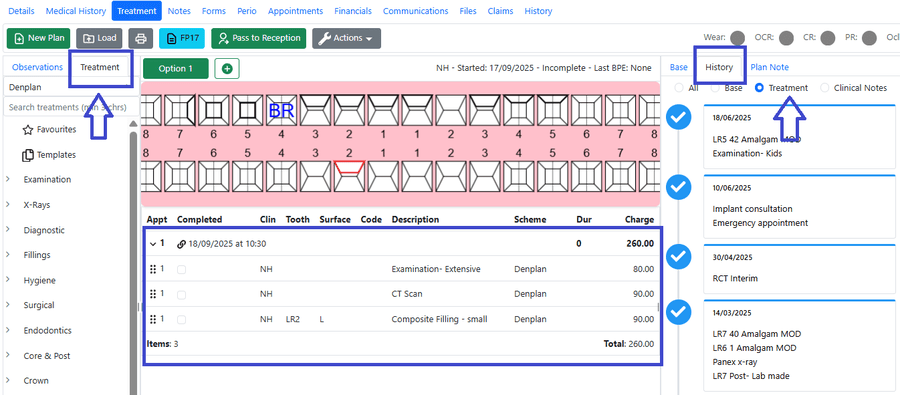
Editing treatment details
- In the treatment plan, single-click on the treatment you want to edit.
- The details will expand, allowing for updating the price, discount, completion date, description, tooth and surfaces, and duration.
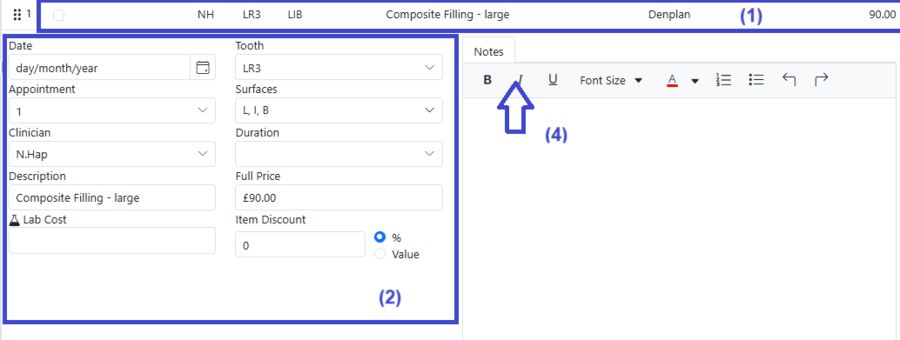
- Any changes made are saved automatically.
- Use the Notes tab to record treatment note.
Drag and drop items within the current treatment plan if necessary.
Viewing a tooth history
- Double-click the tooth number in the chart.
- In the pop-up window, a full list of all activities related to the tooth will appear
Treatment History
- Navigate to the History tab next to the Base Table.
- Use the filter to display the required information:
- All History
- Base Items List
- Completed Treatments across all treatment plans
- Past Clinical Notes
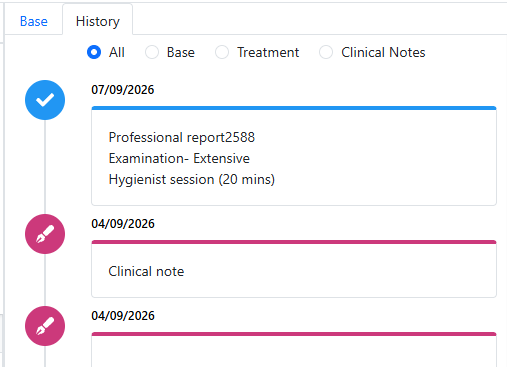
Printing a Treatment Plan
- Click the Print button in the top toolbar.
- In the pop-up window, select the information to include, apply a template or add any comments.
- Click Print.
- A Treatment Plan will appear
- Use the toolbar to print, email or sign it.
Emailing a Treatment Plan
- Click the Print button in the top toolbar.
- In the pop-up window, select the information to include, apply a template or add any comments.
- Click Print.
- A Treatment Plan will appear
- Use the toolbar to email it.
Signing a Treatment Plan
- Click Send for Signing in the top toolbar.
- Configure the form request by selecting a delivery method, expiry period, or adding a message. The treatment plan can be signed online using a secure link sent to the patient, or directly on a tablet within the practice.
- Click Send Request
- Once signed, the document is automatically stored under the relevant course of treatment in the Patient Record.
Linking appointments to treatments
The system allows you to link booked appointments to planned treatments, enabling greater visibility of planned work and enables income forecasting.
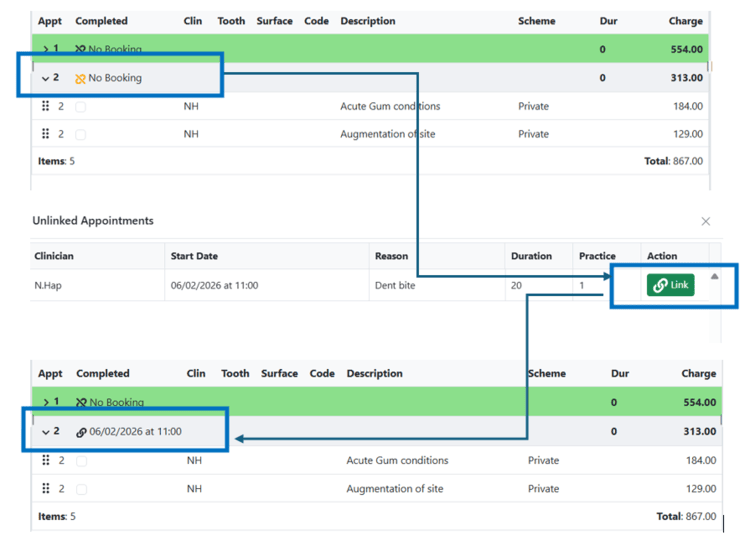
- From the
Patient Record → Treatment - Click the Link icon next to No Booking.
- Select the upcoming appointment
- click Link
You can undo the linking by clicking on the icon again.
Multiple appointments for a course of treatment
Adding multiple appointments for a course of treatment allows dividing a plan into manageable sessions that can be directly linked to scheduled appointments.
- Open an existing plan or start a new treatment course
- Right-click on the top row (next to No Booking).

- Select Add Appointment
- A second appointment will appear. Repeat these steps to add more appointments
- Set a specific appoitment as active to add treatments.
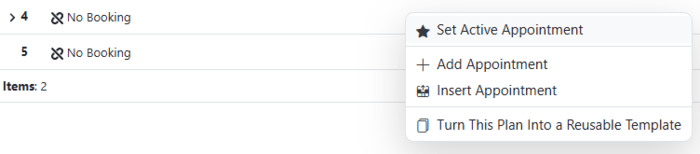
- Drag and drop the required treatments into another appointment
- Move the mouse pointer to the area with six dots and hold the left mouse button
- Drag and drop the required treatments into another appointment

The system adds new appointments to the end of the list and also allows to insert an appoitment between two existing ones
Multiple treatment plan options
This functionality is designed to give patients clear choices that suit different needs, budgets, or timelines. This helps patients make informed decisions before starting treatments and feel more involved in their care.
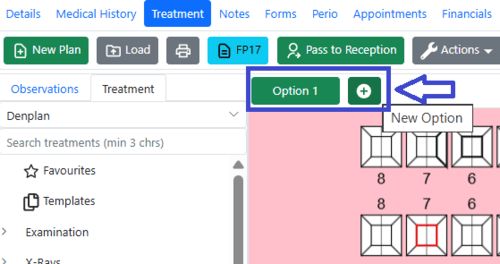
- In the
Patient Record → Treatment - Click the ‘+’ button above the chart
- A pop-up will appear, offering to duplicate the current plan or create a new one.
- Add treatments into the new plan as normal
When a patient approves a plan and treatment begins, the alternative treatment option becomes locked, so treatment cannot begin on the plan that was not consented to.
Loading Imaging Systems
- Click the Imaging System icon on the toolbar.
- If your practice uses a single imaging software, it will automatically open and display the images for the patient currently selected in DentalPlus.
- If multiple imaging programs are configured, a pop-up window will appear. Select the desired software from the list to open it.
Completing a course of treatments
- When a treatment is finished, tick the Completed checkbox next to each treatment in the treatment plan.
- The Completed Date will automatically appear in the corresponding column. To modify this date, click the treatment description and update it in the Item Details.
- Some items in a treatment plan can remain incomplete if necessary.
- To mark the entire plan as complete, go to
Actions → Set Plan Status → Complete.
If a treatment has already been invoiced and you need to change the completion date, first delete the invoice from the patient’s Financial section. Once the invoice is removed, the treatment item will be available for amendment.
Adding discounts
A discount can be applied to the entire treatment plan, so there is no need to apply it to each treatment individually.
Patient Record -> Treatment -> Actions ->Add discount to plan
Once applied, the system automatically reduces the prices of all treatments within the plan and displays the discount on the treatment plan printouts.
A discount can also be applied to an individual appointment only, without affecting the other appointments in the treatment plan.
Patient Record -> Treatment -> Right click next to No Booking ->Set appointment discount
Pass to Reception and Invoicing
The “Pass to Reception” option sends instructions to the reception team, outlining the actions required once the patient’s treatment in surgery is complete.
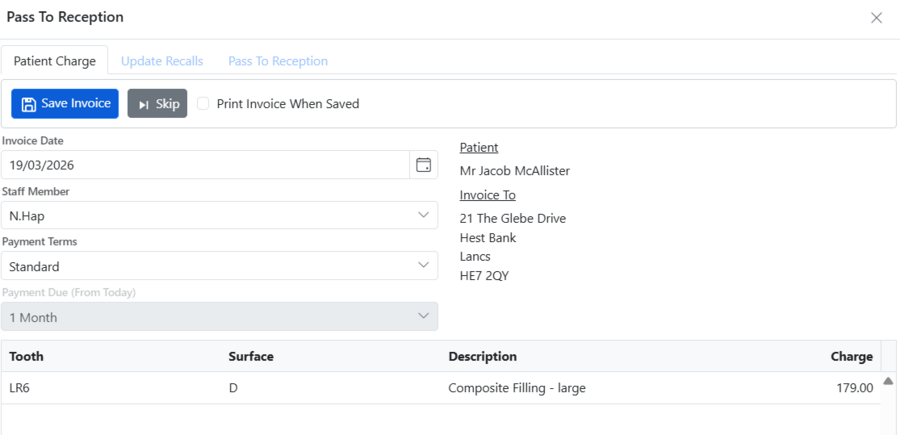
In the Patient Record → Treatment -> Toolbar click Pass to Reception .
Step 1: Patient Charge
Review the invoice details, then save or print as required.
Step 2: Update Recalls
Check and confirm the recall timeframe. This is important for staying in touch with patients with no future appointments.
Step 3: Pass to Reception
Add details for the next appointment. Send the ‘Pass to Reception’ task or close the dialogue
Step 4: Complete a tasks
- Expand the list and double-click on the patient name
- Check details, take payment
- Book future appointments
- Click the Loupe icon, select the required appointment slot, and save the booking.
- If no suitable slots are available, add the patient to the Waiting List.
- Once all steps are completed, the pop-up window will close, and the Pass to Reception task will disappear from the list.
- A task can also be completed manually by right-click the patient in the Pass to Reception list.
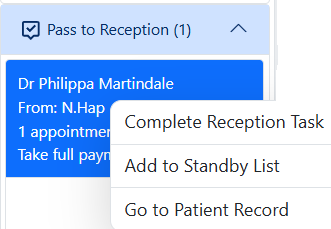
Once a Pass to Reception task is completed, update the patient’s status to “Exited Practice” in the Appointment Book.